Feel like you can’t? Get busy and get it done

I can come up with a gajillion excuses why I can’t. Can’t what, you say? Can’t anything. Ask my mother, I bet she will say I was born moaning “I can’t!” Usually the thing I think I can’t do requires things I think I don’t have—typically, time, money, or energy. Rarely is the problem as simple as I don’t know how. Almost always, I’m bound up by my fear that I will fail. Here’s what to do when you are struck with a case of the “I can’ts” as you are struggling to get your dissertation proposal approved.

I can’t [fill in the blank]

When I was working on my doctorate, my sad refrain to my long-suffering colleagues was “Woe is me, I can’t finish this monstrosity!” While I was writing my first book, I whined frequently “I’ll never get it done!” to anyone who would stand still long enough to listen. I seem to be genetically disposed to complaining that I can’t do something, when the evidence implies otherwise.

The fact is, I did finish my doctorate. I did write that book. I can’t very well point to my track record and say, “See, Carol? You didn’t . . . so you can’t.” Because I did. So clearly, I can. If you get my drift. I confess, I was a Negatron long before there was such a thing. The good news is, it doesn’t matter! Let me repeat: positive attitude or negative attitude, or anywhere in between—it doesn’t matter.

Confidence is nice but not essential

You may be an expert on the power of positive thinking. If so, yay for you. If you don’t tend to look on the bright side, welcome to the club! The good news is, you don’t have to. Confidence is nice but not essential to completing your proposal. All the confidence on the planet is not going to earn approval if your grammar is subpar or you are missing critical citations. Just saying. In fact, I think confidence might be overrated. Confidence can become arrogance in a heartbeat. Arrogance can lead us to assume that our work is stellar when really it’s a big hairy mess.

Some people are naturally confident. I’m not one of them. Lacking natural confidence might sometimes be a good thing. For example, if I were naturally confident, I might say something breezily self-centered like “Feel your fear and do it anyway!” I might say “Go boldly in the direction of your dreams” without noticing you are hiding under the covers. I might say “Hey, all you have to fear is fear itself.” Blah blah blah. But I’m not naturally confident. I’m naturally terrified. You can diagnose me with low self-esteem, personality disorder, whatever. I’m here to tell you, none of that matters. I lack confidence, and I still earned my doctorate—it can be done!

There were times in my 8-year doctoral journey that I seriously doubted my ability to perform to a high enough standard to achieve my dream. When things got intense (meaning, when I was terrified out of my wits that I would fail), I narrowed my focus to the tiny piece of action in front of me: the chapter, the paragraph, the sentence. After I typed each sentence, I stopped to make sure what I was writing was on track and in alignment with my overall purpose and plan.

Sometimes I was too scared to write. Naptime! Right up until the end of the defense, I lacked confidence. As I wrote my book, I lacked confidence. As I write this blogpost, I lack confidence! Argh! However, if you are reading these words, I rest my case!

Action is the magic word

Lately my plaintive cry is “Alas, I can’t be creative. I can’t be successful. I can’t be successful being creative.” It is so much easier to complain about how my dreams daily fail to materialize . . . while ignoring the embarrassing fact that I’m doing practically nothing to help them happen. I spend a lot of time dreaming and fretting and not much time doing. (I can’t because . . . )

What do you worry about? Probably we worry about similar things. Here are a few of my worries: My work isn’t good enough. My topic is stupid. It’s been done. It’s already obsolete. It’s incoherent gibberish. I’ll never get done. This is costing me a fortune. I usually finish up with something like Alas, alackaday, woe is me [place back of hand on forehead].

We don’t need positive thinking, and we can’t sit around doing nothing. It’s all about action, people. Any action. You don’t have to believe in it, you just have to do it (obligatory kudos to Nike’s tagline, forever embedded in the American zeitgeist). It doesn’t have to be perfect, it just has to get done. This isn’t the culmination of your career, it’s just the beginning. You have lots and lots of road ahead of you to get it right.

Some words on the paper is better than zero words, even if they are incoherent gibberish. That’s how this blogpost came to be. Bla bla bladdy bla and next thing I know, I’ve got something done. Not perfect. Who cares. Sometimes, yes, the good is the enemy of the best, but perfectionism is the enemy of good enough. Nobody gets it right all the time. The ones who win (you define winning) are the ones who don’t quit, no matter what.

Here’s my suggestion: Work on your outline first. Get it on paper (that means type it up). Figure out what sources support which subsections. Then you can take a nap.

If you need some help, check out my book.

Print version
Kindle version

How to insert a table of contents in Word

A table of contents is an essential element of your proposal. All long documents must have a table of contents. It is placed in the front matter of the paper, before that crucial section break that separates the front matter from the body of the paper. We (Microsoft Word and I) fondly call it the TOC.

Let me say right now, never type a TOC! Let Word do the work for you. Seriously! I’m not joking. I don’t care what your institutional guidelines say. You can break the links later and format it to meet the institutional standard, but first, let Word do the heavy lifting. Once you’ve set all your headings and subheadings with Word styles, it only takes a few seconds to generate the TOC. If you try to type it, it will be rife with errors as you continue to work on your paper. We are only human, after all, and Word is, well, Word is Word.

Before you insert a TOC, though, you must do one very important thing: set the Word styles for your headings and subheadings.

Step 1: Apply Word styles

Your TOC is based on Word styles. Word styles are rich, complex … and mysterious, but that doesn’t mean we should ignore them. We need Word styles. You need them, I need them, all academic writers need them. If you can bring yourself to learn the basics of Word styles, then maybe you won’t have to fork over $500 to get your dissertation formatted by a professional editor like me. I know learning Word styles doesn’t sound like a whole lot of fun, but it might not be as bad as you fear.

In the upper right corner of your Word window, in the STYLES command group, look for a dinky barely visible arrow ( Figure 1). Click it.

Figure 1. Open Word’s Style task pane.

A task pane will open along the right side of your Word window. It might look similar to the one in Figure 2, although it might show more or fewer styles, depending on the number of styles in your document and how your task pane is configured.

Figure 2. Word’s Style task pane (yours may look different).

Some heading styles are “built-in” to Word, but you can modify them. Heading levels start with Heading 1 (the highest level in your TOC). I’m not sure how many heading levels you can have, but I guarantee, for a typical dissertation, you will probably need only four. Maybe three, depending on how your institution guidelines determine the heading levels.

To apply a heading style, click anywhere in a line of text (or select the text) and click the heading level you want in the Style task pane. If you see some but not all the heading levels you want, click the Options button in the lower right corner of the Styles task pane and choose “Show next heading when previous level is used.” Word will always show you one level higher than the last level you applied.

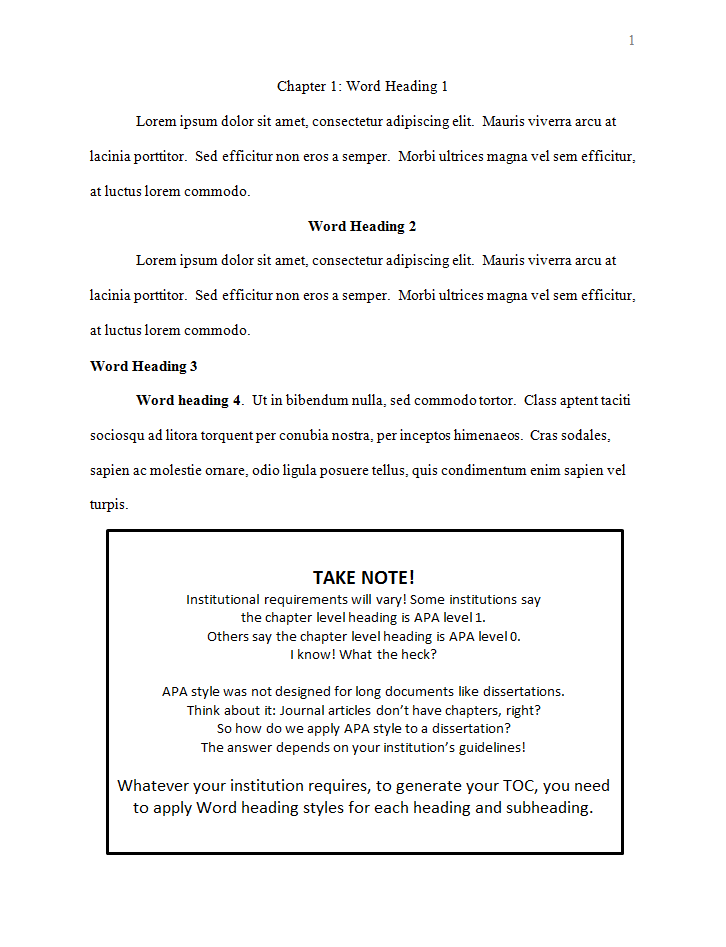
Figure 3 shows a sample page of heading levels.

Figure 3. A sample page of Word heading levels

After you have applied your heading levels (Heading 1, 2, 3, and so on), Word can generate an accurate TOC. Open the Navigation pane (Click “Find” or Control+F). The Search pane has three tabs: Navigation is the tab on the left. You should see an outline view of all your main headings and subheadings (usually levels 1 and 2; see Figure 4). This is a preview of your TOC!

Figure 4. The Navigation pane shows main heading levels

Now finally, you are ready to insert your Table of Contents!

Step 2: Insert the Table of Contents

Before you insert your Table of Contents, note this: Wherever your cursor is, that is where your Table of Contents will appear, so make sure you insert it on the right page.

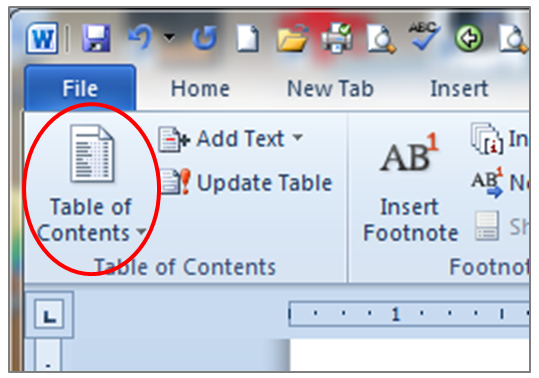
Find the TABLE OF CONTENTS button over on the left side of the REFERENCES RIBBON (Figure 5). You can just click it, but for most dissertations, that won’t be good enough (incorrect formatting).

Figure 5. Inserting the TOC—step 1

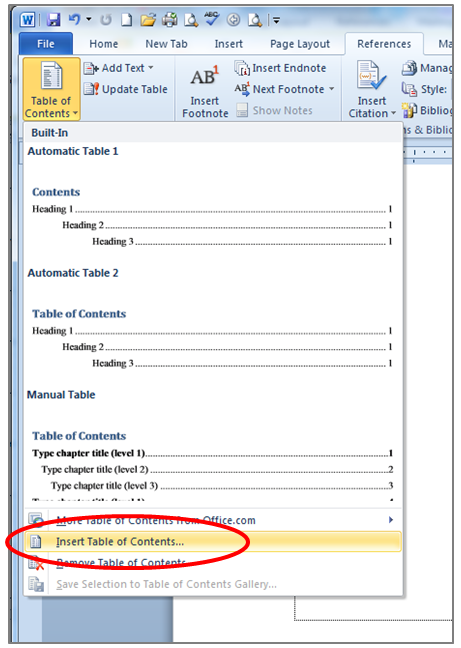
Click the DROP-DOWN ARROW and choose INSERT TABLE OF CONTENTS (Figure 6).

Figure 6. Inserting the TOC—step 2

The Table of Contents dialog box appears. Unless you have special formatting requirements, leave everything checked (show page numbers, right-align page number, show tab leader dots, from template, show three levels, and use hyperlinks instead of page numbers). If you set the heading styles correctly, you won’t need to click the OPTIONS button. Instead, choose MODIFY (Figure 7).

Figure 7. Inserting the TOC—step 3

Figure 8 shows a cascade of dialog boxes. Don’t freak out. This is the process we use to set the formats for each TOC level, one at a time.

The box at the far right is the original box shown in Figure 7. When you click MODIFY, the box in the middle comes up. This is where you choose what level you want to modify, starting with TOC 1. Click MODIFY.

The box on the left should be familiar if you have ever formatted a paragraph in Word. This is the place where you modify styles—line spacing, alignment, paragraph spacing—all that good stuff.

Your institution will have specific line spacing guidelines. This is where you can set double-spacing or single-spacing with a set amount of paragraph spacing before or after. Follow your institution’s guidelines.

Figure 8. Inserting the TOC—step 4

Figure 9 shows a typical format for TOC level 1.

Figure 9. Inserting the TOC—step 5

Now you are ready to format TOC level 2. When you click OK, you are returned to the middle box from Figure 7. Choose TOC 2. Click MODIFY (Figure 10). Set the indent for the second level of your TOC. Many institutions require a half-inch indent for each level. Some only require a quarter inch. Follow your institution’s guidelines.

Figure 10. Inserting the TOC—step 6

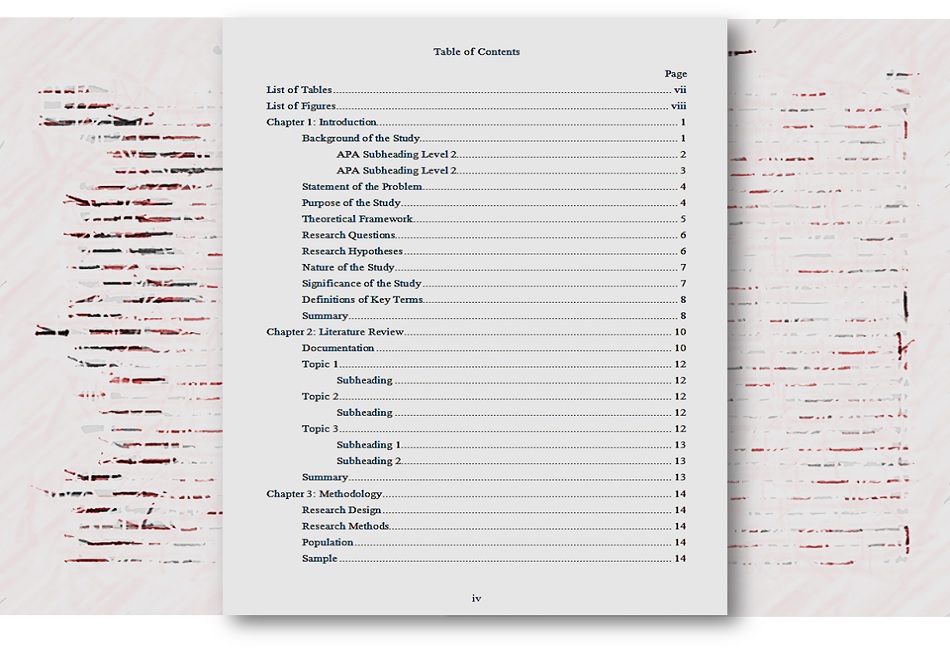
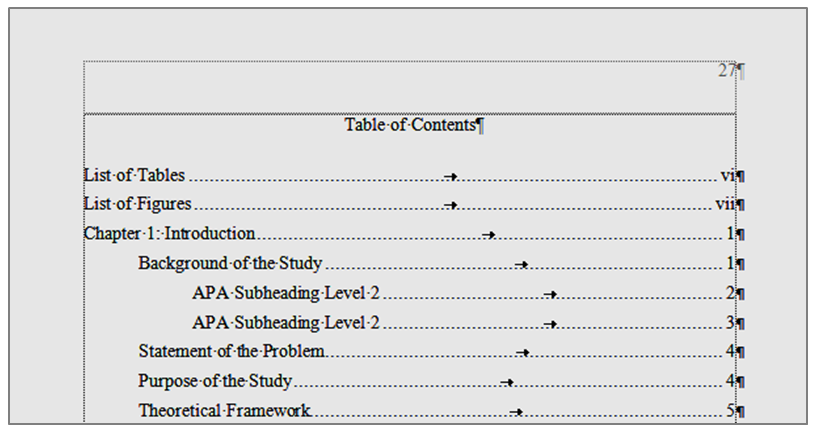
Remember, wherever your cursor is, that is where your Table of Contents will appear, so make sure you insert it in the right place. If you aren’t happy with it, follow the steps from Step 1 (insert Table of Contents) and go through the process again. Word will ask you if you want to replace the existing TOC. Say yes, otherwise you’ll end up with two. Figure 11 shows a finished TOC, with nonprinting characters showing so you can see how Word automatically inserted leader dot tabs and right-aligned all the numbers.

Figure 11. The finished Table of Contents (with nonprinting characters showing)

If you are feeling confident with styles, to save some time, you can choose TOC 1, TOC 2, TOC 3, etc. (one at a time) in the Styles task pane, right click on the style, and choose MODIFY to modify the formatting of each level. Formatting changes are immediate.

To update your Table of Contents

Pagination happens. To update your TOC to reflect revisions to your headings and page numbers, click anywhere in your TOC and press F9 (or right-click, choose UPDATE FIELD). Update often, and don’t forget to update the TOC before you submit your paper.

To delete your Table of Contents

Select the entire TOC and press the DELETE button.


You can find more information about using Word to format your dissertation in my book.

print: http://amzn.to/2emI0A1

kindle: http://amzn.to/2jeqpIZ


A down and dirty discussion of the dissertation proposal [Part I]

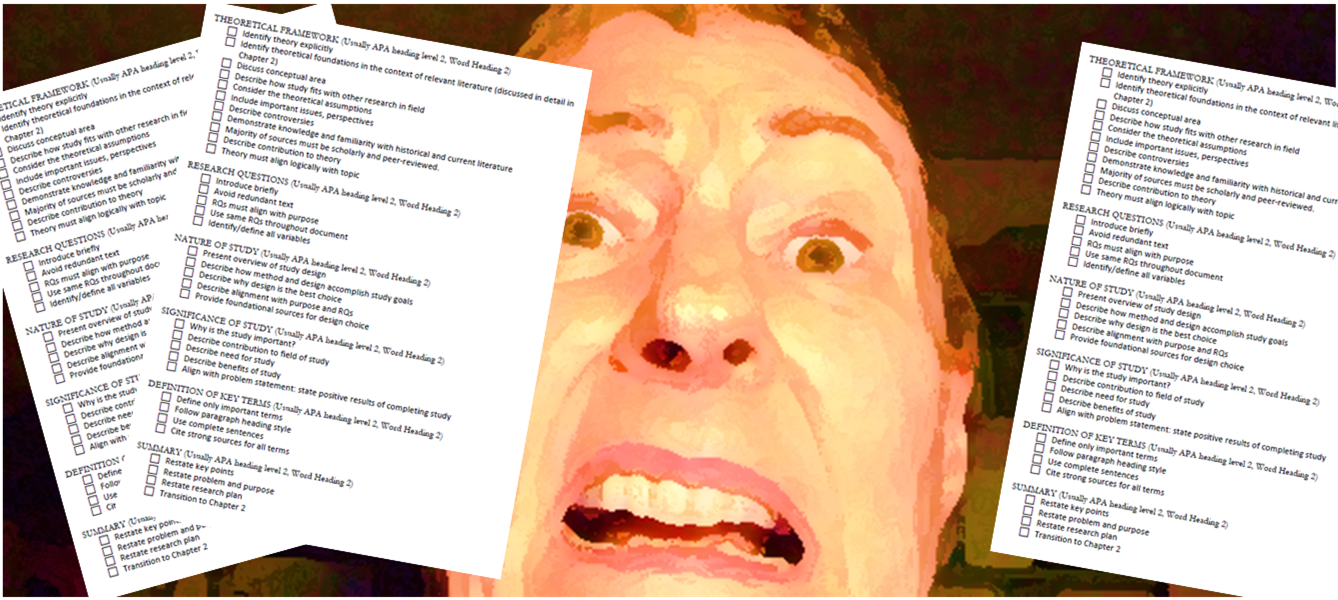
Scared of dissertation checklists

Download my dissertation checklist for free

Despite the photo, I like lists. Checking things off my list gives me the sense of accomplishment that helps me keep going. In fact, I doubt if I would have finished my dissertation without my dissertation checklist.

I’ve updated my dissertation checklist, and now you can download it for free (without registering or anything!) here. Just sneak in and grab it in Word format. Customize it for your own needs. This generic checklist includes many of the elements you need in your dissertation proposal. I also preview the elements you’ll need to include in your dissertation manuscript, after you collect and analyze your data.

The dissertation proposal

A large project like a doctoral research project has many moving parts, one of which is the dissertation. In the social sciences, dissertations are typically five or six chapters, plus some front matter (title page, abstract, acknowledgments, table of contents, lists of tables and figures, maybe a list of abbreviations) and some back matter (generally just the list of references and the appendices).

The first three chapters of a typical dissertation comprise the dissertation proposal. In this and three subsequent blog posts, I describe the sections of a dissertation proposal. Part I covers the front matter of your proposal. Part II covers Chapter 1, the introduction to your study. Part III covers Chapter 2, the basis of your justification for the study, also known as the Literature Review. Part IV focuses on Chapter 3, the blueprint for your research project, usually entitled Methodology. My discussion is generic, based on what I usually see in the dissertations I edit. Not all institutions require the same format. Follow your institutional guidelines.

The dissertation proposal: the front matter

The term front matter refers to all the pages that come before the first page of Chapter 1. Different universities require different elements in the front matter. Sometimes institutional guidelines can be quite strict. Other times they are refreshingly flexible. Here are the typical elements I find in the front matter section of a dissertation proposal.

Title page. Typically, the front matter starts with a title page. At the least, the title page provides the title of the study, the author, the degree, the school, and the date. Some of you will have to add the names and titles of your committee members. Follow your institutional guidelines. They may even have a template you can paste into place and customize for your project.

Abstract. The abstract is the overview or summary of the entire study. For your proposal, include one statement to introduce the topic, followed by the research problem and purpose of the study. Don’t include your research questions—later on, you won’t have room. For your proposal, focus on the problem, purpose, participants, and methods, and keep it short: The typical Abstract in a finished dissertation manuscript is no more than 350 words.

Acknowledgments & Dedication. We all want to acknowledge the people who helped move us along our dissertation journey. You can ignore this page for your proposal—in fact, I recommend that you do. Leave a placeholder (the title and a blank page), and fill it in after you’ve finished and received approval your dissertation manuscript. Then you can thank your mother, your mentors, your spouse, whoever helped you along your journey. I love to edit acknowledgments pages—I can hear the relief, gratitude, and profound weariness in the dissertators’ voices as they thank everyone under the sun. I know the feeling. I’d like to thank my cat, Eddie. An optional Dedication page may follow the Acknowledgments page.

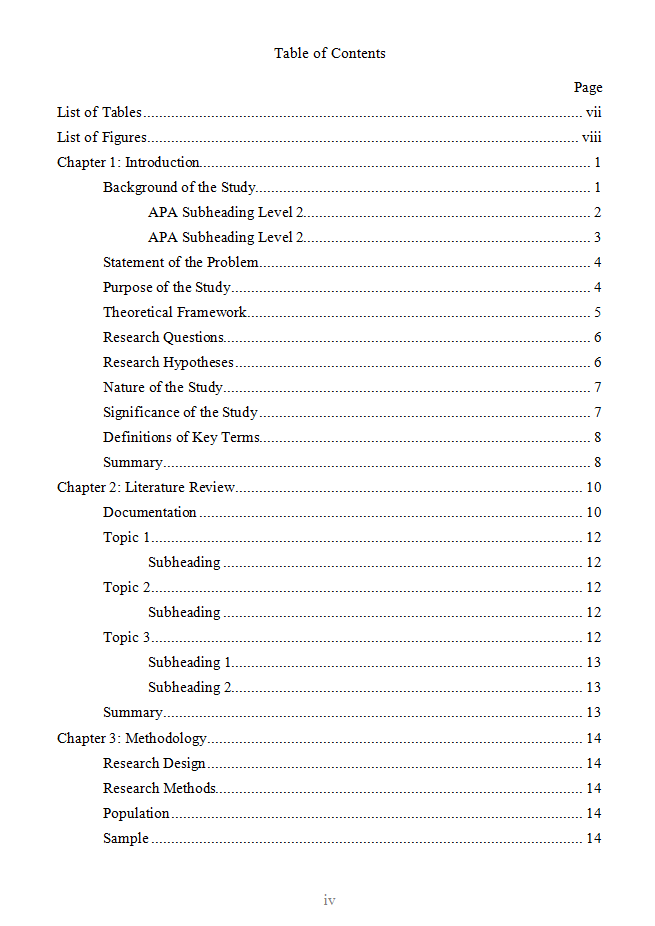
The Table of Contents. Next up is usually the Table of Contents. If you don’t know by now, the Table of Contents (fondly known as the TOC) is an outline of your entire paper, usually to three or four levels of subheadings, depending on how your institution treats chapter headings. Some institutions put chapter headings in a class of their own, separate from the other heading and subheadings. Other institutions treat chapter headings as level 1 headings. Whatever. It matters, but not enough to fret about now. You’ll figure it out when your Chair dings you for not having three (or four) heading levels in your TOC. Argh.

A sample Table of Contents

A few dissertators who aren’t afraid of Word styles have figured out that Word can insert an automatic TOC. Most dissertators would probably like that idea, but are terrified of setting up and applying Word styles to their headings, and thus resort to typing their TOCs manually. Oh the humanity. I take a look, cringe, and delete the entire thing, all those pages of spaces, tabs, raggedy page numbers—yep, all gone. Then I proceed to set styles for all those headings and subheadings. I go through the paper, tagging each heading and subheading with the appropriate style. That takes a while, depending on how hard it is to figure out the dissertator’s intentions. Then I insert a TOC, bada boom, it’s done, in about six seconds. That is how you do a TOC.

Every now and then I will edit a paper from some harried dissertator whose institutional guidelines seem hell bent on making it impossible for anyone to get approval. Things in the TOC must line up just so, the k under the j, and indented just this amount, no more and no less. In those rare cases, Word’s automatic TOC feature will only get us partway to the goal. Annoying, but what can we do? I guess we could do some programming in Word, but that’s above my paygrade. Feel free. If the TOC has minute formatting requirements, I insert the TOC, convert it to plain text, and then format it as required, hoping that the dissertator won’t move stuff around and mess up the pagination. That’s a different subject for another day.

To update your TOC, click anywhere in it and press F9 on your function key row, or right-click and choose Update Field. You can update the entire table or just the page numbers.

Lists of Tables and Figures. The Table of Contents is usually followed by the List of Tables and the List of Figures (starting on separate pages). Usually the List of Tables comes first, but actually, I believe the List that should come first is the one that is the longest. Follow your institution’s template.

The magical trick of creating these lists is to use Word’s INSERT CAPTION function. You can insert labels above each table (e.g., Table 1) and below each figure (e.g., Figure 1). Word will generate accurate lists of each. You won’t have to type anything except the table titles and the figure captions. Bada bing. Magic. On rare occasions, I like Word. Making these lists is one of them. To update your list, click anywhere in it and press F9 on your function key row, or right-click and choose Update Field.

List of Abbreviations. Most dissertators don’t include a list of abbreviations, unless they are in the military. Dissertators who are or were in the military usually present an extensive list of acronyms, because that is their common language. If you have a list of abbreviations or acronyms, present it simply and concisely, without definitions. You’ll have a section in Chapter 1 to present your definitions of key terms.

The end of the front matter

When I see the term front matter, for some reason I think of gray matter and then wonder, do I have any left? Uh-oh. Then I think, front matter doesn’t matter, which is just silly—of course, front matter matters, if you are writing a dissertation proposal. How your front matter looks is a huge clue to the quality of the rest of your proposal. For example, if I see that you’ve manually typed your Table of Contents, I know that your comfort level with Word is low. That means I will be on the lookout for other formatting errors, and I will find them. Front matter matters in the sense that this section sets the level of expectation for the three chapters that follow.

The final page of the front matter marks the transition between the preliminary gobble-de-gook (technical term for all that stuff I’ve been talking about) and your actual paper. The front matter prepares your reader (or reviewer) for the proposal that follows. That means you need a dividing line between the two sections. We accomplish this in Word using a section break.

That means, at the end of the final page in your front matter, there should be a NEXT PAGE SECTION BREAK. This is the crucial section break in most dissertations. You can have more, and you may be required to have more, but if the pagination of the front matter changes on page 1 of Chapter 1, you’ll need at least this one section break or you’re a goner. You’ll find this essential section break in the little section break boutique under the PAGE LAYOUT Ribbon.

The section break tells Word that the formatting in section 2 can be different from the formatting in section 1. That’s great, because quite often the page number format changes from lowercase Roman numerals to Arabic numerals, don’t ask me why. If you ever accidentally deleted a section break and cried out in horror as your margins, page numbers, headers, and footers went wonky, you know what I am talking about. Quick, CONTROL Z!

If you can’t see your section breaks, it’s not your eyes. Turn on the “nonprinting characters” by clicking the SHOW/HIDE button on your Home Ribbon. Voila! Suddenly the extent of your crappy keyboarding ability becomes apparent. Yikes! Where did all those extra spaces and tabs come from? Yep. You tried to align things using spaces, didn’t you? Whoopsy.

In the next blog post, I dig deep under the hood of Chapter 1 to reveal the surprising number of essential elements, all of which you will need if you want to get your proposal approved.


Print version
kindle version

Verified by MonsterInsights